Sunday, December 27, 2015

Cheeseburger Soup

Everybody in my family loves a hot, hearty soup to warm them up on a cold winter day. Whodathunk it would be 75 degrees on December 27th? No worries, with the A/C on it was nice and chilly inside and the soup went down just fine.

This has all the yummy flavors of a cheeseburger, with a few veggies thrown in for good measure.  I served it with some fresh baked rolls and everybody went back for seconds.  Next time I'll serve it with pickle spears on the side!


Cheeseburger Soup
Prep time: 10 min  Cook time: 30 min

Serves 8

1 lb ground beef
3/4 cup chopped onion
3/4 cup shredded carrots
3/4 cup diced celery
1 tsp dried basil
1 tsp dried parsley flakes
4 Tbs butter, divided
3 cups chicken broth
4 cups diced peeled potatoes
1 (15 oz) can diced tomatoes
1/4 cup flour
8 oz Velveeta cheese, cubed
1-1/2 cups milk
3/4 tsp salt
1/2 teaspoon pepper
1/4 cup sour cream

In a 3-qt. saucepan, brown beef; drain and set aside. In the same saucepan, saute the onion, carrots, celery, basil and parsley in 1 tablespoon butter until vegetables are tender, about 10 minutes. Add the broth, potatoes, tomatoes and beef; bring to a boil. Reduce heat; cover and simmer for 10-12 minutes or until potatoes are tender.

Meanwhile, in a small skillet, melt remaining butter. Add flour; cook and stir for 3-5 minutes or until bubbly. Add to soup; bring to a boil. Cook and stir for 2 minutes. Reduce heat to low. Stir in the cheese, milk, salt and pepper; cook and stir until cheese melts. Remove from the heat; blend in sour cream.

432 calories per serving.  Click here for more nutritional info and shopping list!

Sunday, December 20, 2015

Gingerbread Caramel Bars

I really love how different seasons have their own special flavors, like pumpkin in the fall and peppermint and gingerbread for Christmas. It makes them more special when you wait all year for them! I love gingerbread anything and I collect gingerbread recipes all year, so when Christmas rolls around it's always a struggle to decide which one I'm going to make.

This recipe is very similar to a chocolate chip caramel bar I made a few weeks ago that was DIVINE, so I was pretty sure this was going to be awesome, too.  It was chewy, gooey, caramel-y, and had a delicious gingerbread flavor. Everybody who tried it loved it!  Next time I might pretty up the squares with a little swirl of decorative frosting, but it definitely doesn't require any extra sugar.  It is tooth-rotting sweet but oh so good!


Gingerbread Caramel Bars
Prep time: 15 min  Bake time: 30 min
Serves 25

1 (15.25 oz) box yellow cake mix
1 egg
3/4 cup molasses
1/2 cup butter, softened
1/4 cup dark brown sugar
(or just add more molasses to light brown sugar)
1/2 cup flour
1 1/4 tsp ginger
1 1/4 tsp cinnamon
1/4 tsp cloves
1/4 tsp nutmeg
5.5 oz caramels (about 20 caramels)
1/2 cup sweetened condensed milk

Combine cake mix, egg, molasses, butter, sugar, flour and spices and mix until smooth. Batter will be thick and sticky.

Line a 9x9 pan with parchment paper, extending the paper up the sides of the pan.
Add half of the gingerbread batter to the pan and spread evenly. Batter will be sticky, so it might help to drop spoonfuls into the pan, then spread.

Melt caramels in a microwaveable bowl until mostly smooth, with a few chunks left.  Add melted caramel to sweetened condensed milk and combine.  Pour caramel mixture over the gingerbread dough in the pan.

Drop spoonfuls of remaining dough over the caramel layer, spreading a bit to mostly cover the caramel layer.

Bake at 350 for 30-33 minutes.  Allow to cool in the pan, then cut into squares.

199 calories per serving.  Click here for more nutritional info and shopping list!

Funfetti Gooey Butter Cookies

I love to bake cookies for the holidays--lots and lots and lots of cookies! I like to eat them, of course, but I also like to give them to my friends and coworkers and even the mailman and UPS guy. But this year I didn't plan on baking anything because I was going out of town for Christmas.  I gave my manicurist some candy that someone else had given me, hoping she would just assume I had made it myself (of course she had to ask!) and I felt so bad when I had to tell her I didn't.  And then I started watching Christmas movies where everyone was eating Christmas cookies and the cravings kicked in.  When I found out my old bosses would be joining us for our company Christmas party and I hadn't bought a gift for them, I knew a batch of cookies had to be made.

I wanted something simple yet festive (and I didn't want to have to go to the store for ingredients), plus my new boss loves Funfetti, so when I saw this recipe I thought it was perfect.  I didn't actually have a Funfetti cake mix in the pantry, but I did have a plain white cake mix and a big bottle of Christmas sprinkles, so I improvised and made my own Funfetti by adding about half a cup of sprinkles to the plain mix.  I didn't measure, I just kept dumping them in till it looked right.  They turned out super cute and festive and really yummy! The texture was perfect - thick and soft on the inside with a slight crispiness on the outside.  I will definitely be making these again, I'll just switch up the sprinkles for different occasions!


Funfetti Gooey Butter Cookies
Prep time: 15 min(+1hr chilling) Bake time: 10 min
Serves 50

8 oz cream cheese, softened
½ cup butter, softened
1 egg

1 (15.25 oz) box Funfetti cake mix
¼ cup sprinkles (if desired)
¼ cup powdered sugar

In a large bowl, beat cream cheese and butter together until smooth.  Add in egg and continue mixing, scraping sides as necessary.  Add in the cake mix and beat until combined.  Stir in extra sprinkles, if desired.

Chill dough for about an hour.  Preheat oven to 350°.

Form dough into 1 inch balls and roll in powdered sugar. Place on baking sheet 2" apart and bake for about 10 minutes.

Allow to cool on baking sheet for 2-3 minutes and then transfer to a wire rack to cool completely.

73 calories per cookie.  Click here for more nutritional info and shopping list!

Friday, November 13, 2015

Chocolate Chip Caramel Cookie Bars

Anyone who knows me knows I have a terrible sweet tooth.  That, combined with my love of baking and my genetic predisposition towards chubbiness means I am in a constant battle against those malevolent little creatures who sew your clothes tighter at night - calories.  I have lost, and gained back, the same 30 pounds four times in the last 15 years, and since I am currently on the wrong side of that cycle, I'm trying very hard to resist making all the delectable dessert recipes I've been accumulating on Pinterest for the last several years.  All that self control came to a screeching halt a few days ago, though, when someone posted one of those video recipes on Facebook and I was subjected to a vision of molten caramel flowing over chocolate chip cookie dough while I was innocently browsing my newsfeed looking at cat pictures.  My resistance instantly crumbled and I soon found myself in the kitchen making these bars.  OMG, they were SO worth it!  I didn't look at the calorie count on these until just now (it's even worse than I imagined) because I agree with the adage that if you know how many calories are in your dessert you're eating it wrong.  These are definitely not diet-friendly in any way, but they were so amazing I don't regret making them one bit.  I did, however, send 3/4 of them with my husband and daughter to share with their classmates and coworkers, and although I wish I still had some left, it's probably for the best that I don't because I would be eating every last one of them myself!


Chocolate Chip Caramel Cookie Bars
Prep time: 10 min Bake time: 30 min

serves 24

2 1/4 cups flour
1 tsp baking soda
1 tsp salt
1 cup butter, softened
3/4 cup sugar
3/4 cup packed brown sugar
1 tsp vanilla extract
2 eggs
2 cups semi-sweet chocolate chips (I normally prefer milk chocolate, but these bars are so rich that I think semi-sweet or a combination is best)

5 oz evaporated milk
1 bag (14 oz) caramels
1/2 c. peanut butter

Preheat oven to 375 degrees. Grease a 9 x 13 inch pan.

Combine flour, baking soda and salt in small bowl. Beat butter, sugar, brown sugar and vanilla in a large mixing bowl until creamy. Add eggs, one at a time, beating well after each addition. Gradually mix in flour mixture. Stir in chocolate chips.

Spread half of cookie dough into the prepared pan. Bake for 8-10 minutes. Remove from oven.

While the cookie dough is baking, melt caramels and evaporated milk in a double boiler. Add peanut butter after caramels are melted. Melt thoroughly. Spread over baked cookie dough base.
With the remaining cookie dough, drop by spoonfuls on top of the caramel mixture.
Bake for 15-20 minutes or until light golden brown.

340 calories per serving.  Click here for more nutritional info and shopping list!

Sunday, November 1, 2015

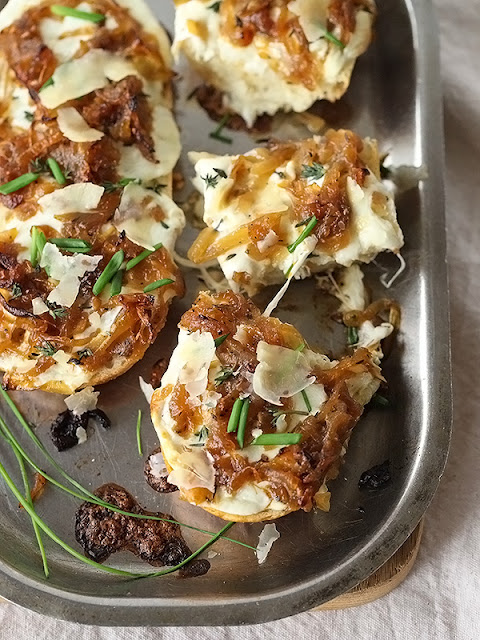
French Onion Cheese Toast

I've had this recipe saved for more than a year but I never got around to making it because the prep time is so long! If you haven't figured it out yet, I'm into instant gratification. I don't want to slave over the stove for hours. Very few foods are worth all that! But my husband LOVES sautéed onions and I love cheesy bread, so I finally decided to break down and make this.

I AM SO GLAD!!!! This was so freakin' delicious. The onions were AMAZING. I lost count of the number of times my husband said something along the lines of "this is so good." And making it really wasn't that bad--most of the prep time was hands-off.  You could probably even make the onions ahead of time and then bake this when you're ready. This would be great as a party appetizer, but we had it as a side dish with steak and it was perfect. I couldn't find Gruyere or Fontina cheese at Wally World today, so I just used some mozzarella and parmesan, but the fancy cheese might've been better. Hard to imagine it could get much better, though!


French Onion Cheese Toast
Prep time: 90 min Bake time:15 min

Serves 16

3 Tbs butter
3 onions, peeled and thinly sliced
2 cloves garlic, chopped
3 sprigs fresh thyme, leaves only
1 Tbs sugar
1 tsp kosher salt
1 tsp black pepper
1/2 Tbs balsamic vinegar
1 loaf french bread, sliced 1 inch thick
2 cups Gruyère or Fontina cheese, shredded

Melt butter in a large skillet over medium heat. Add onions, garlic and thyme leaves and cook for 10 minutes, stirring occasionally. Lower heat to medium low, cover and cook for 1 hour, stirring occasionally.

Add sugar, kosher salt and pepper and cook for 10 minutes.

Add balsamic vinegar and cook for another 10 minutes or until onions are caramelized.

Preheat oven to 400°F.
Place bread slices on a baking sheet. Sprinkle evenly with shredded cheese then spoon caramelized onion on top.  Bake for 10-15 minutes or until cheese has melted and bread turns golden brown.

Garnish with extra thyme leaves if desired.  Serve immediately.

100 calories per serving.  Click here for more nutritional info and shopping list!

Sunday, October 18, 2015

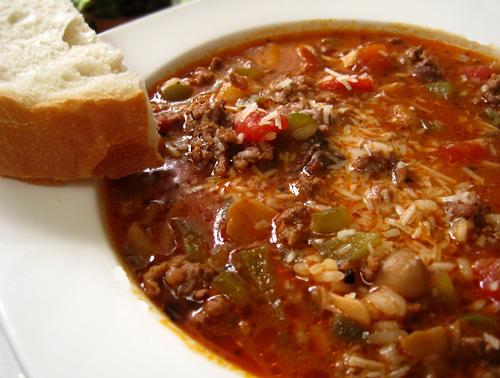
Stuffed Pepper Soup

I felt the need to don a chunky sweater and closed-toe shoes for the first time since last winter today, so I guess fall has officially, well, fallen. I'm not too excited about having to trade my shorts and tees for heavy jeans and sweaters, but I am definitely ready for some hearty fall food! All my friends are doing this extreme diet challenge and I'm over here like: need more carbs!  Carbs are my favorite. Next to cheese. And chocolate. Wait, I think that's a carb, too. But I digress.

This recipe isn't exactly health food, but it's got all the major food groups so it can't be that bad. I suppose if you wanted to lighten it up a little you could swap the beef for ground turkey and leave off the cheese. I might try the ground turkey next time, but you'll have to pry my cheddar from my cold, dead hands.

If you like stuffed peppers, this tastes exactly the same, just in belly-warming soup form, and although it's not really any quicker, it is a little easier and it makes a ton so you can feed an average size family a couple times or invite over all your friends and tempt them off their diets.


Stuffed Pepper Soup
Prep time:5 min  Cook time:45 min
Serves 10

2 pounds ground beef
2 quarts water
1 can (28 oz) tomato sauce
1 can (28 oz) diced tomatoes
2 cups uncooked long grain rice
3 chopped green peppers
1/4 cup packed brown sugar
2 tsp salt
2 tsp beef bouillon granules
1 tsp pepper
1 tsp garlic powder
1 tsp onion powder
2 cups shredded cheddar

In a Dutch oven, cook beef over medium heat until no longer pink; drain. Stir in all remaining ingredients except for the cheese; bring to a boil. Reduce heat; cover and simmer for 30-40 minutes or until peppers are tender.  Sprinkle with cheese before serving.

430 calories per serving.  Click here for more nutritional info and shopping list!
Monday, September 21, 2015

Grape Salad

I am not a big fan of salad.  Sure, I'll scarf down that tiny little pile of lettuce slathered in Ranch dressing that they give you at the restaurant to placate you while they cook your steak, but traditional salad is not one of those things I could ever get excited about.  However, I do love the "salads" that have nothing in common with a Caesar or Cobb -- you know, the ones that are more like dessert!

This salad makes a half-hearted effort to be healthier by using light sour cream and low-fat cream cheese, but I definitely wouldn't call it health food by any means, but it is definitely good food, and super quick and easy!


Grape Salad
Prep time: 5 min
Serves 8

1 ½ lbs green seedless grapes
1 ½ lbs red seedless grapes
8 oz light sour cream
8 oz low-fat cream cheese, softened
½ cup granulated sugar
1 tsp vanilla

Topping:
¼ cup brown sugar
½ cup chopped pecans

Remove stems from grapes and rinse. Beat sour cream, cream cheese, granulated sugar and vanilla with mixer. Stir grapes into the mixture and place in a serving dish. Combine topping ingredients and sprinkle over top right before serving.

338 calories per serving.  Click here for more nutritional info and shopping list!
Thursday, September 17, 2015

Cheesy Sausage Pasta

One of the most popular posts on this blog is my Cheesy Sausage Pot, which is an amazing Crock-Pot dish chock full of cheesy, sausage-y deliciousness. It's great when you need dinner to be ready as soon as you get home. But what if you forget to fill the Crock-Pot in the morning? Yeah, been there, done that. No worries, you can still have that amazing flavor in less that 30 minutes and with only one pot to wash! This recipe uses pasta instead of potatoes so it cooks up super quick and requires practically no prep time at all.  I got off work at 5 and was putting away the leftovers by 6!


Cheesy Sausage Pasta

Prep time: 5 min  Cook time: 20 min
Serves 5

1 Tbsp olive oil
1 lb smoked sausage, sliced
1 cup diced onion
1 Tbsp minced garlic
2 cups chicken broth
1 (10 oz) can diced tomatoes
1/2 cup milk or heavy cream
8 oz dry pasta (any small pasta will do)
1/2 teaspoon salt and pepper, each
1 cup shredded Cheddar-Jack cheese
1/3 cup chopped green onions

Add olive oil to a 4-5 quart saute pan over medium high heat. Add onions and sausage and cook until lightly browned. Add garlic and cook for about 30 seconds.

Add chicken broth, tomatoes, milk, pasta, and seasonings. Bring the mixture to a boil, cover, and reduce heat to low. Simmer for about 15 minutes, or until pasta is tender.

Turn off the heat and stir in 1/2 cup of cheese. Sprinkle remaining cheese on top and cover for about five minutes to allow cheese to melt. Top with sliced scallions and serve.

601 calories per serving.  Click here for more nutritional info and shopping list!

Monday, September 7, 2015

Microwave Acorn Squash

I was in the checkout line at WallyWorld last week and the cashier seemed totally blown away that I was buying acorn squash. "What is that?" she said.  "How do you cook it?"

"Uh, acorn squash," I replied, flabbergasted, "and you just microwave it."

It amazes me how many people are completely clueless when it comes to food prep. They miss out on so many great foods just because they don't know how to prepare them or aren't willing to try! As much as I love new and creative recipes, cooking does NOT need to be complicated. Most foods taste better without a whole lot of other stuff mucking them up anyway. This squash recipe is so simple and so delicious, yet how many people regularly serve acorn squash? Not a lot, I'm sure.  It's just as yummy as sweet potatoes and looks so beautiful on the plate. You could also bake these, but it takes a whole lot longer and doesn't taste that much different. Since it's still 90 degrees here in NC, I definitely prefer 15 minutes in the microwave over 75 minutes in the oven!


Microwave Acorn Squash
Cook time: 15 min

Serves 4

2 medium acorn squash
1/3 cup butter, melted
3 tablespoons brown sugar
1/4 tsp cinnamon
1/8 tsp ground nutmeg
3 Tbs honey

Place whole squash on a microwave-safe plate, microwave on high for 3-4 minutes. Cut in half; remove seeds and strings. Cut a thin slice from bottom of squash with a sharp knife to allow it to sit flat. Wrap each squash half with plastic wrap.  Place squash, cut side down on, in a microwave-safe dish. Microwave for 4-5 minutes.

Meanwhile, combine the butter, brown sugar, cinnamon and nutmeg. Turn squash over, unwrap and brush insides with butter mixture. Microwave for 1-2 minutes or until squash is tender.  Drizzle with honey.

297 calories per serving.  Click here for more nutritional info and shopping list!

Sunday, September 6, 2015

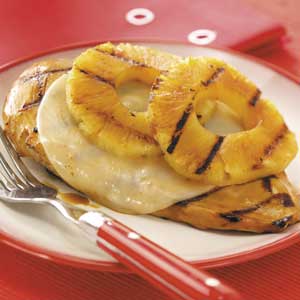
Pineapple Teriyaki Chicken

Happy early Labor Day everybody! It has been FOREVER since my last blog post, but since I'm already 3 days into my 4 day weekend, I finally feel like I have some spare time to post a new recipe.  Actually, I was totally convinced that I had already posted this recipe like, eons ago because I've been making it for my family for years, but I searched through my whole backlist and couldn't find it, so I decided it was definitely time for me to share it.

This is a great summer recipe that was just perfect for the last true weekend of summer because it's fresh and fruity and tastes just like summer, plus it cooks on the grill which is totally obligatory on Labor Day weekend.

The prep for this meal is super simple and it cooks up really quick, but it does call for some marinating, so you have to plan ahead if you want to have this easy dinner.

If you prefer your meat between a bun, this also makes a great sandwich, but the extra carbs are definitely not necessary.


Pineapple Teriyaki Chicken
Prep time: 5 min (+ 8hrs marinating)

Cook time: 15 min
Serves 4

1 can (20 oz) sliced pineapple
1/2 cup teriyaki sauce
4 boneless skinless chicken breasts
4 slices provolone cheese

Drain pineapple, reserving juice; refrigerate pineapple. In a small bowl, combine teriyaki sauce and reserved pineapple juice. Pour 3/4 cup into a large resealable plastic bag; add chicken. Seal bag and turn to coat. Refrigerate for 8 hours or overnight. Cover and refrigerate remaining sauce for basting.

Drain and discard the chicken marinade. Grill chicken, covered, over medium heat or broil 4 in. from the heat for 4-6 minutes on each side, basting frequently with some of the reserved sauce.

Grill pineapple slices for 2 minutes on each side or until lightly browned, basting with remaining marinade. Top each piece of chicken with cheese and pineapple slices. Grill, covered, for 1-2 minutes or until cheese is melted.

322 calories per serving.  Click here for more nutritional info and shopping list!
Saturday, July 11, 2015

Egg Rolls

Everybody in my house loves Asian food. The kiddo likes sweet and sour chicken (which is basically chicken nuggets with a fruity sauce to dip them in) and the hubs and I like pretty much everything stir-fried and served with a side of soy sauce. One of my favorite Asian dishes is egg rolls. I remember when I was a little kid my dad would take me out to eat at the grocery store deli because I loved the egg rolls they served!

Weird, I know. I used to order an egg roll as an appetizer every time we went out to the Asian restaurant, but I rarely order them now because I love these homemade ones so much! Even better, this recipe makes a ton, so I can have them as a main course instead of just an appetizer. They taste best fresh, so I use that as an excuse to eat as many of them as I want as soon as they come out of the fryer. 


Egg Rolls
Prep time: 30 min  Cook time: 15 min
Makes 20

1 (6 oz) can tiny shrimp or chicken
1 cup chopped canned bean sprouts
1 (8 oz) can water chestnuts, drained, chopped
1 (14 oz) bag coleslaw mix
1 cup diced onion
2 Tbs sesame seed oil
1/2 tsp salt
1/2 tsp pepper
1/4 cup soy sauce
1 egg, beaten
20 egg roll wrappers

Stir-fry protein, bean sprouts, water chestnuts, coleslaw mix, and onion in oil till crisp-tender, about 5 minutes. Add salt, pepper, and soy sauce to taste.

Scoop 1/4 cup of filling into an egg roll wrapper. Pull one corner of wrapper tightly over filling, then fold in the side corners. Brush beaten egg on the top corner and finish rolling. (Watch the short video below - it's easy!)

Deep fry at 325°F till golden brown and crispy. Drain and serve hot. I like to serve these with fried rice.  (I'll post that recipe soon!)

If you have any leftovers, make sure you reheat them in the oven on a metal pan so they regain their crispiness. Soggy egg rolls are yucky! You can also individually wrap uncooked egg rolls in wax paper then freeze to cook later.


Friday, July 3, 2015

Chicken Parmesan

One of my dear friends has been sick for some time, leaving her husband and child to fend for themselves. Assuming they might enjoy a home-cooked meal over Mickey D's once in a while, I have offered to cook for them on multiple occasions. Knowing their love of Italian food, the first meal I made for them was this family favorite recipe for chicken parm. It was a big hit. It went over so well, the next time I offered to make them a meal they wanted it again. And the next time. And the next time!

Needless to say, this meal is super yummy comfort food.  Like all my favorite meals, it's also really easy and comes together in mere minutes. I serve it with breadsticks and a salad for a great weeknight meal.


Chicken Parmesan
Prep time: 5 min  Cook time: 25 min
Serves 4

2 boneless skinless chicken breasts, butterflied into thin halves
½ cup breadcrumbs
1 tbsp dried oregano
1 tbsp dried basil
1 tbsp dried thyme
1 tsp kosher salt
1 tsp ground black pepper
2 tbsp olive oil
2 cups tomato sauce
4 oz fresh mozzarella, thinly sliced
2 tbsp grated Parmesan cheese

Preheat the oven to 500 degrees F. (Yes, that's right!)

Combine the herbs, salt, pepper, and breadcrumbs in a shallow dish to blend. Coat chicken with breading mixture and shake off any excess.

Heat olive oil in a large oven-proof skillet over medium-high heat. Add the chicken and cook just until brown, about 3 minutes per side. Remove the skillet from the heat.

Spoon the tomato sauce over and around the chicken. Sprinkle parmesan over each chicken breast. Cover each breast with mozzarella slices.

Bake, covered with foil, for 10 minutes, and then uncovered for 5 minutes, until the cheese melts and the chicken is cooked through.

312 calories per serving.  Click here for more nutritional info and shopping list!

Wednesday, June 24, 2015

French Onion Chicken Casserole

When I first saw this recipe I thought it sounded okay, but not exactly earth-shattering. I put it on my menu, but I didn't really have high hopes for it. Boy, was I wrong!  This was so yummy and satisfying; I had two servings and would've had a third but I didn't want to look like a pig in front of my company. I was very reluctant to give up the leftovers when my husband asked if we could send a few servings home with my mother-in-law.

This takes a little prep work: you have to precook the chicken and the noodles before you bake the casserole, but you could easily prep this ahead of time and bake it later. You could even stick it in the freezer to save for a lazy day!


French Onion Chicken Casserole
Prep time: 30 min  Bake time: 30 min

Serves 8

4 cups cooked chopped chicken
1 1/2 cup frozen mixed vegetables, thawed
2 cans cream of chicken soup
16 oz container French Onion Dip
1 cup cheddar cheese
12 oz egg noodles
1 cup crushed french fried onions

Preheat oven to 350 degrees. Lightly spray a 9x13-inch pan with cooking spray.

Cook egg noodles according to package directions; drain.

Combine chicken, veggies, soup, dip, and cheese. Stir in cooked egg noodles.

Pour mixture into prepared pan. Top with crushed french fried onions.

Bake for 25-30 minutes, until heated through.

394 calories per serving.  Click here for more nutritional info and shopping list!

Tuesday, June 23, 2015

Blueberry Custard Pie

I LOVE blueberries, but not the tiny, sour, overpriced ones that the grocery store has most of the year. I lived in Michigan for a few years and there were half a dozen blueberry farms within 20 miles of my house and every year we'd buy gallons of dark purple, sweet, juicy berries the size of marbles. They didn't need anything to be delicious so we ate them plain by the fistful, but we'd also eat them with ice cream and bake them in pies.

I was so excited last week when I learned my local blueberry farm was open for business and I sent my husband with explicit directions to come home with no less than 2 gallons of blueberries. I wanted to make a blueberry trifle for the company I had coming, blueberry muffins for breakfast, and 2 batches of blueberry cobbler to feed the teenagers at youth group. He came home with NONE! By the time he got there, they were sold out.Total bummer. I gave up on my extensive blueberry plans, but I was so in the mood for blueberries that I gave in and bought 1 pint from the grocery store. It wasn't enough to make most of the recipes I was craving, but it was just enough to make this pie. I've never put custard in my blueberry pie before, and I've never put streusel on top, but I really loved the end result! This was good cold, but it was amazing served warm with a scoop of vanilla ice cream on top.


Blueberry Custard Pie
Prep time: 15 min  Bake time: 45 min

Serves 8

1 cup (8 oz) sour cream
¾ cup sugar
1 egg
2 Tbs flour
2 tsp vanilla extract
¼ tsp salt
2 cups fresh blueberries
1 (9 inch) unbaked pie crust

Streusel Topping:
½ cup brown sugar
⅓ cup flour
¼ cup butter, softened
½ cup chopped pecans

Preheat oven to 400 degrees F.

In a large bowl, mix the sour cream, ¾ cup sugar, egg, 2 tablespoons flour, vanilla extract and salt with a spoon until smooth. Gently fold the blueberries into the sour cream mixture. Spoon the filling into the unbaked pie crust.

Bake in the preheated oven for 25 minutes.

While the filling is baking, prepare the streusel topping: In a medium bowl combine the brown sugar and flour. Cut in the butter until the mixture resembles course sand. Fold in the chopped pecans.

After the filling has baked 25 minutes, sprinkle the streusel crunch topping over the top of the pie. Bake an additional 15-20 minutes or until filling is set and topping is brown.

Make sure your crust doesn't burn. Either use a crust shield or make a loose foil tent towards the end of baking.

Remove from oven and let pie sit for at least 10-15 minutes. Serve pie warm or chill it and serve cold.

352 calories per serving.  Click here for more nutritional info and shopping list!

Sunday, May 3, 2015

Veggie Crescent Squares

Have you ever been so wiped out that you could feel every single inch of your body--because all of it hurt? Yeah, that was me about 2 am yesterday morning after spending every spare moment of the past week preparing to cater a big party at my church. The guest list went from 60 to 100 overnight and the actual turnout was even higher. My menu was a little intense for a party of 60 and absolutely overwhelming for 110. but this was one dish that was no big deal to double and then quadruple as the guest list grew. I love this for parties because, besides being easy, it's fresh and pretty and everybody loves it.  Feel free to substitute whatever vegetables you prefer, but I like the color palette this variety provides.


Veggie Crescent Squares

Prep time: 15 min  Cook time: 15 min
Serves 24

2 (8 oz) cans crescent roll dough

2 (8 oz) blocks cream cheese, softened
1 cup mayonnaise
1 (1 oz) package dry ranch dressing mix
1 cup fresh broccoli, chopped
1 cup chopped tomatoes
1 cup chopped bell pepper
1 cup chopped cucumber
1/2 cup sliced green onions
1 cup shredded carrots
1 cup shredded cheddar cheese

Preheat oven to 375 degrees F.


Roll out the crescent roll dough onto a 9x13 inch baking sheet, and pinch together edges to form the crust. Bake crust for 12 minutes in the preheated oven. Once finished cooking, remove crust from oven and let cool 15 minutes without removing it from the baking sheet.

In a small mixing bowl combine cream cheese, mayonnaise, and dry Ranch dressing. Spread the mixture over the cooled crust.


Arrange broccoli, tomato, green bell pepper, cauliflower, shredded carrots, and cheddar cheese over the cream cheese layer. Chill for one hour, slice and serve.


212 calories per serving.  Click here for more nutritional info and shopping list!

Thursday, April 16, 2015

BBQ Chicken Burritos

April has been an unusual month for our family, menu-wise. I knew the doctor I work for was going to take a week off when his wife gave birth to their baby, and I knew I was going to go visit my parents in Indiana when that happened, but babies are notorious for not coming exactly when you expect them, so I had no idea when I was going to be gone. In preparation, I made the entire month's menu as simple as possible so that no matter when I left, my husband and daughter would be able to handle preparing their own meals.

Don't get me wrong, some of my favorite meals are super simple, but they don't really make for great blog content.  This recipe, however, has way more flavor than it has ingredients. Now, you can make this with any BBQ sauce you like and it will be great, but I have to admit that I use a secret special sauce that takes these burritos over the top.  Years ago, my husband brought home a bottle of "Pig Out Sauce" that a coworker had purchased from a BBQ joint in Spartanburg, SC. He claimed it was the best sauce ever and insisted we try it. We made these burritos for the first time with that sauce and now I can't imagine them without it. Once a year or so, when his coworker takes a trip to Spartanburg, my husband has him pick up a gallon of it and we divide it up into smaller bottles and freeze it so we always have some on hand. If you really want to taste the ultimate version of these burritos, come on over to my house the next time I make 'em and I'll let you try my special sauce, but until then, any tangy BBQ will be fine.


BBQ Chicken Burritos
Prep time: 5 min  Cook time: 10 min
Serves 4

1/2 lb boneless skinless chicken, cubed
1 green pepper, chopped
1 medium onion, chopped
4 Tbs oil, divided
1/2 cup barbecue sauce
1-1/2 cups shredded Mexican cheese blend
4 large flour tortillas, warmed

In a large skillet, heat 2 tablespoons of oil then cook the chicken, green peppers and onion over medium heat for 6-8 minutes or until chicken is no longer pink. Stir in barbecue sauce and heat through.

Sprinkle cheese down the center of each tortilla; top with chicken mixture. Fold sides and ends over filling and roll up.

In a large skillet, brown burritos in remaining oil on all sides over medium heat.

626 calories per serving.  Click here for more nutritional info and shopping list!

Tuesday, March 17, 2015

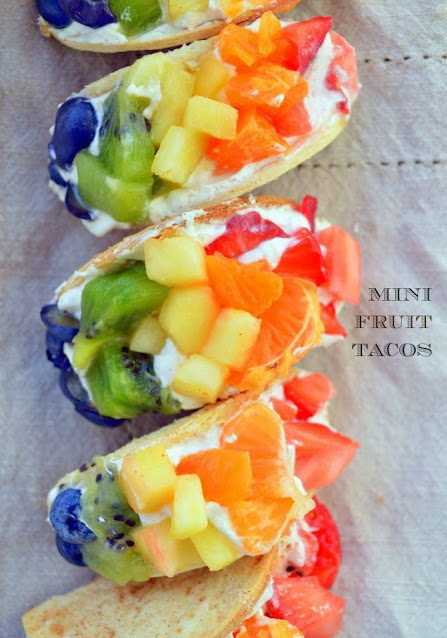
Rainbow Fruit Tacos

Happy St. Patrick's Day, everybody! Today is the day I try to pretend I actually know something about my Irish heritage. My maiden name was Shannon, and I'm a Notre Dame fan, but otherwise I'm not much more Irish than a box of Lucky Charms.  Plus, I recently read a Buzz Feed article listing 7 myths about St. Patrick's Day that essentially negated everything I thought I knew about Ireland. Corned beef and cabbage as Irish staples? Totally bogus. That was sort of a relief, though, because I don't like either one of those.  What I do like are these adorable fruit tacos! This rainbow needs no pot of gold at the end, any little leprechaun would find these to be a perfect treat all by themselves.


Rainbow Fruit Tacos
Prep time: 30 min  Cook time: 7 min
Serves 7

Shells:
7 large flour tortillas
1 Tbs sugar
½ tsp ground cinnamon
nonstick cooking spray

Filling:
8 oz light cream cheese, softened
1 Tbs honey
1 Tbs sugar
½ tsp ground cinnamon

½ cup chopped strawberries
½ cup chopped mandarin oranges
½ cup chopped pineapple
½ cup peeled and chopped kiwi
½ cup blueberries

Preheat the oven to 350°F. 

To prepare the taco shells, use a biscuit cutter (or an empty can) to cut 3" circles out of your large tortillas. Lay the cut tortillas out flat and very lightly spray them with the nonstick cooking spray. Mix together the cinnamon and sugar. Sprinkle tortillas evenly with the cinnamon sugar.

Gently fold each tortilla in half and hang them upside down on the rungs of your oven rack (a slight fold will yield a wider taco shell that is easier to fill). Bake for 5 - 7 minutes and then remove and gently set aside.

For the filling, beat the cream cheese, honey, sugar, and cinnamon until fluffy, about 3 minutes.

Spoon 1-2 teaspoons of the filling into each shell. Top with the chopped fruit.

384 calories per serving.  Click here for more nutritional info and shopping list!

Thursday, March 12, 2015

5 Spice Cream Cheese Chicken

I work in a small optometrist's office, and apparently my ability to use ctrl+alt+del effectively qualifies me as the office computer expert. I have become the de facto IT consultant, responsible for solving all our office technology woes. Mind you, I don't have the faintest idea what is wrong most of the time, but I usually manage to poke my way through enough settings menus to chance upon a solution. You know what I've learned from all this experimenting?  Computers are way too complicated! As complicated as they are, you'd think they'd be sophisticated enough to fix themselves when we screw them up!

Today's tech problem was a little more complicated than most and called for the ultimate simple solution--buy a new computer.  Unfortunately, that means tomorrow will be spent setting it up and transferring all the important stuff from the old to the new--another complication in the making. Good thing I had an amazingly simple supper planned for tonight. Just a few basic ingredients made a delicious piece of chicken and an incredible sauce that was also great as a gravy on mashed potatoes. Next time, I'll make a double batch so I can have leftovers for dinner the next night. Now that would be a simple supper!


5 Spice Cream Cheese Chicken

Prep time: 5 min  Cook time: 15 min
Serves 4

1 lb boneless, skinless chicken
½ tsp salt
¼ tsp garlic powder
½ tsp adobo seasoning
½ tsp cayenne pepper
¼ tsp smoked paprika
¼ tsp ground mustard
1 Tbs olive oil
1 Tbs butter
2 Tbs heavy cream
¼ cup milk
¼ cup cream cheese

Pat the chicken dry.

Combine the salt and spices in a small bowl.  Sprinkle the seasoning onto both sides of all the chicken pieces, rubbing it into the meat.

Melt the butter and olive oil in a large skillet over medium-high heat.  When hot, add the chicken.

Cook for about 3-5 minutes per side, until golden brown.

Once cooked on both sides, reduce the heat to medium-low and add the heavy cream, milk and cream cheese. Stir to combine and coat the chicken in the cream mixture.  Let the sauce thicken for about 3 minutes before serving.

282 calories per serving.  Click here for more nutritional info and shopping list!
Wednesday, March 4, 2015

Huli Huli Chicken

A week ago today, we got six inches of snow and I got a day and a half off work for the weather. Today, it was 73 degrees, sunny, and beautiful! I wish I could've gotten a day off work today instead.  But, at least my menu was perfectly apropos. This incredible chicken could be baked in the oven, but it was soooo yummy seared on the grill! I'm sure we made the neighbors salivate from the smell of delectably charred meat, especially since we took the opportunity to eat out on the back deck.

This is not my typical quick and easy type of recipe: it calls for overnight brining then a lengthy amount of time on the grill, but it was totally worth it. I suppose you could skip the brining, but it adds great moisture and flavor to the inside of the meat that you really don't want to miss. Don't get lazy with the basting, either. Multiple coats every 5 minutes or so creates an amazing crust that's practically like candy.

The story of Huli-Huli chicken is kind of interesting. In 1955, a guy named Ernest Morgado cooked up a big batch of chicken for a farmer's group. It had been marinated in his take on the classic Japanese teriyaki sauce, and painted with the sauce on the grill. It was such a hit that, by the time he died, it had become a signature dish beloved throughout Hawaii, served mostly by shade tree cooks from roadside stands, parking lots, and parks at fundraisers. Drive around Oahu and if you see smoke rising and smell something sweet, it is likely Huli-Huli chicken. The locals keep napkins in their glove compartment just in case!

Rather than turn scores of chicken pieces one by one when he was catering an event, he sandwiched the meat between two mesh grates, and, with the help of an assistant, flipped the whole contraption. Sort of like Hawaiian rotisserie. When it was time to turn, he would shout "huli" which is Hawaiian for "turn" to his assistant who would shout "huli" back, grab the handles on the other side of the grates, and turn the chicken over, lickety split. Thus, Huli-Huli Chicken was born!


Huli Huli Chicken
Prep time: 10 min (plus 4+ hrs brining)
Cook time: 30 min
Serves 6

For the Brine:
6 chicken leg quarters, cut up
1 quart of water, or to cover
2 Tbs of kosher salt
1/4 cup apple cider vinegar

Chicken Seasoning:
1 tsp black pepper
1 tsp Creole or Cajun seasoning
1 tsp garlic powder

For the Sauce:
1 cup pineapple juice
1 (8 oz) can tomato sauce or ketchup
1/3 cup low sodium soy sauce
1/4 cup honey
1/4 cup apple cider vinegar
1/4 cup brown sugar, packed
1/2 tsp ground ginger
1 Tbs Worcestershire sauce
1 Tbs of olive oil
1 tsp of hot sauce
Juice of one lemon


Whisk together the brine ingredients. Place the chicken in a non-reactive bowl or zippered bag and pour the brine over. Seal tightly and place in a bowl in the refrigerator for several hours or overnight. Remove chicken from brine; drain, but do not rinse. Pat chicken dry with paper towels and rub in a light dusting of black pepper, Creole and Cajun seasoning and garlic powder on both sides. Let rest while you preheat grill to high.

When ready to grill, whisk together the sauce ingredients. Leave one grill zone (one or two burners) on high, turn all other burners down to medium. Oil the grates, and quickly sear the chicken on the hottest part of the grill, with the lid closed, about 2 to 3 minutes per side. Move the chicken to the cooler part of the grill, apply a generous basting of the sauce on both sides, and grill covered, about 25 to 30 minutes, turning and basting every few minutes, until thoroughly cooked through. An instant read thermometer should register 165-175 degrees F in the thickest part of the thigh.

560 calories per serving.  Click here for more nutritional info and shopping list!

Sunday, March 1, 2015

Spicy New Orleans Shrimp

I tend to think of myself as a self-described Wonder Woman. I have a full time job and a family to take care of, I cook amazing meals and do pretty much all the household chores every day, I blog usually at least once a week, I volunteer at my church, I decorate lavishly for all major holidays, and for the last year I have been writing a novel and trying to find an agent to help me get it published! Somehow, I manage to do all this and still find time to keep up with my Facebook newsfeed, read a stack full of library books every month and watch all my favorite TV shows. I have to say, I amaze myself sometimes!

Most days, I juggle all this with ease, and a smile on my face. Some days, however, my super powers slip just a little. Like the last time I planned to make this fabulous dish.

The recipe is for 2 lbs of shrimp--I had only one. It calls for chili sauce--I forgot to buy any. It's supposed to marinate for 4 or more hours--I started it 20 minutes before I planned to eat. The sauce is supposed to be simmered for 10 minutes--I dumped it straight onto the shrimp instead. To top it all off, I was serving this with my Crock Pot Corn Casserole, which is supposed to cook on high for 2 hours, but I only put it on low for 2. Definitely NOT my finest moment! 

Amazingly enough, it STILL turned out awesome! This sauce is absolutely delicious, so I recommend serving it with some crusty french bread to sop up any extra.


Spicy New Orleans Shrimp
Prep time: 15 min (plus 4+ hrs)
Bake time: 20 min
Serves 5

2 pounds shrimp, peeled and deveined
1/2 cup butter, melted
4 Tbs chili sauce
3 Tbs olive oil
2 Tbs worcestershire sauce
2 Tbs fresh lemon juice
1 Tbs fresh parsley
1 1/2 tsp cayenne pepper
1 1/2 tsp Liquid Smoke (hickory flavor)
1 tsp paprika
1 tsp oregano
1/2 tsp Tabasco sauce
5 cloves fresh garlic, minced

Add all ingredients except shrimp to a saucepan, stir and let simmer for 10 minutes. Remove pan from heat and let cool.

Arrange the shrimp in an oven- proof casserole dish and pour the sauce over the shrimp. Cover and refrigerate for at least 4 hours, or preferably overnight.

Preheat oven to 400°F. Bake shrimp for 15 - 20 minutes.

411 calories per serving.  Click here for more nutritional info and shopping list!

Friday, February 13, 2015

Cheesy Zucchini Rice

Did you know there is a "National Sneak Some Zucchini Onto Your Neighbor’s Porch" day? No joking--it's August 8th and it honors the longtime tradition of dumping your extra zucchini onto some unsuspecting neighbor's doorstep in an attempt to get rid of the excess! Crazy, right?

Well, I don't garden, so I don't have an abundance of zucchini to use up, but I am not really a fan of it either, so when my neighbor "gifts" me with a bag of it, I am always looking for creative ways to sneak it into my meals.  I already shared by awesome skillet mac and cheese recipe that is a great vehicle for hiding zucchini and this is another winner. There is no need to peel it, either. If you grate it finely with a box grater or your food processor (or the grating attachment for your KitchenAid) you won't mind the peel a bit, and it's full of extra nutrients!


Cheesy Zucchini Rice

Prep time: 5 min  Cook time: 15 min
Serves 5

1 cup long-grain white rice
2 cups chicken broth
1 zucchini, grated (don't peel)
1 cup shredded sharp cheddar
1/2 teaspoon garlic powder
1/2 tsp salt
1/4 tsp pepper
1-2 Tbs milk, if needed

In a medium saucepan, combine the rice and chicken broth. Bring the mixture to a boil, reduce the heat, cover and let the rice simmer for 15-20 minutes until the rice is tender and most of the liquid has been absorbed.

Remove the rice from the heat and stir in the grated zucchini, cheese, garlic powder, salt and pepper. Add a tablespoon or so of milk to adjust the texture if needed. Serve warm.

304 calories per serving.  Click here for more nutritional info and shopping list!

Saturday, January 31, 2015

Apple Cider Glazed Chops

Don't you just love fall, when the leaves are crisp, the pumpkins are bright and shiny, and there's always a jug of spicy apple cider in the fridge? Yes, I KNOW it's January! A girl can dream, can't she?

I normally would be fantasizing about springtime instead, but thanks to some creative freezing, I still have plenty of tangy cider at my disposal. When cider was in season, I froze about a half a gallon of it in ice cube trays then stuck the cubes in a freezer bag. Now, whenever I want some cider for my favorite fall recipes, all I have to do is thaw it!


Apple Cider Glazed Chops

Prep time: 15 min  Cook time: 15 min
Serves 6

2 lbs bone-in pork chops

3 apples (optional)

Rub:

2 Tbs brown sugar
2 tsp chili powder
1 tsp garlic powder
1 tsp salt
½ tsp pepper
1 Tbs olive oil

Apple Cider Glaze:

1½ cups apple cider
¼ cup maple syrup
1 Tbs Dijon mustard
½ tsp crushed pepper flakes
½ tsp salt

Preheat grill to medium high heat.


In a small saucepan, prepare the glaze by combining the apple cider, maple syrup, Dijon mustard, crushed red pepper flakes, and salt. Bring to a simmer.


While the cider comes to a simmer, prepare the pork rub. In a small bowl combine the brown sugar, chili powder, garlic powder, salt and pepper. Mix thoroughly with a fork. Add the oil to the spice mixture. It will be the consistency of a crumbly paste. Pat the pork chops dry with paper towels and then cover the chops on all sides with the spice rub.


Put the spice covered pork chops on the heated grill and thoroughly brush with the cider glaze. Grill for about 6 minutes. Flip the chops and thoroughly brush with the glaze on the other side. Grill for about 2 more minutes, flip and brush again. Repeat this process until the chops cook for 10-12 minutes total, and reach an internal temperature of 145 degrees. It's okay for pork to have a little pink in the middle.


If you're also grilling apples, slice them into 1/2 inch thick rings, brush them with glaze and grill for about 2 minutes per side.


393 calories per serving.  Click here for more nutritional info and shopping list!

Chicken with Basil Cream Sauce

I have been a super busy girl lately, barely time to make supper let alone blog about it. Work has been crazy, so my energy level at the end of the day is pretty much zero. That's why I was thrilled when this deceptively simple recipe turned out so darn good!  It's not surprising really, with it's Alfredo-esque sauce studded with fresh basil for gourmet flavor.  Next time I might double up on the sauce and serve it with some garlic breadsticks so I can sop up every last drop.


Chicken with Basil Cream Sauce
Prep time: 5 min  Total time: 20 min
Serves 4

2 Tbs butter
¼ cup milk
½ cup bread crumbs (I used seasoned)
2 large boneless, skinless chicken breasts, butterflied into 4 thinner pieces
½ cup chicken broth
1 cup heavy whipping cream
1 jar (4 oz) chopped pimientos, drained
½ cup grated Parmesan cheese
¼ cup minced fresh basil
Pepper to taste

Preheat the oven to 170°F or warm setting.

Melt the butter in a large saucepan over medium heat.

Pour the milk in a shallow dish. Place the breadcrumbs in a second dish. Dip each of the chicken pieces into the milk then into the breadcrumbs. Transfer to the skillet and allow to cook until browned on both sides and cooked through, about 5 minutes per side. Transfer the chicken to a cooling rack placed over a baking sheet and keep warm in the oven.

Add the broth to the skillet. Bring to a boil and whisk to bring up the browned bits off the bottom of the pan. Add in the cream and the pimientos. Cook until slightly thickened. Reduce the heat, then add the Parmesan cheese and basil. Season to taste with pepper.

Serve the basil cream sauce over the chicken.

445 calories per serving.  Click here for more nutritional info and shopping list!


Monday, January 12, 2015

Crock Pot Corn Casserole

My best friend has this really great corn casserole recipe. It's sweet and creamy and very corny (I mean that in a good way--unlike my husband's sense of humor!) The only problem is that it has to bake for a long time. It's totally worth it, but still, I don't have that kind of patience when I come home from work hungry and cranky.

So I found this recipe on Pinterest the other day for Crock Pot corn casserole, and the ingredient list was pretty much identical to my friend Melissa's.  Of course, I had to give it a try, and it was awesome! It had the same crispy exterior, creamy interior and corny sweetness, but I can throw it together on my lunch break and it's ready when I get home!


Crock Pot Corn Casserole
Prep time: 5 min  Cook time:2-4 hrs
Serves 8

8 oz cream cheese, softened
2 eggs, beaten
½ cup sugar
8 ½ oz corn muffin mix
2 ½ cups frozen corn
1 can (16 oz) creamed corn
1 cup milk
2 Tbsp butter, melted
1 tsp seasoned salt
¼ tsp nutmeg

Grease a slow cooker or line it with a liner.

In a bowl, stir together cream cheese, eggs and sugar. Add in remaining ingredients and mix well.

Pour into slow cooker and cook on high for 2 hours or low for 3-4 hours.

Tip: If you need to be away from your slow cooker for longer than this takes, put your Crock Pot on a timer! I assembled this at 1pm and set the timer to start at 3 so it would be ready around 5.  It worked out perfectly!

417 calories per serving.  Click here for more nutritional info and shopping list!